
Time to make ravioli to put up in the freezer! I like to make ravioli in the fall when the weather is cooler and I can spend a whole day in the kitchen. And it truly takes me a whole day to make these starting with putting together the meat filling to making the pasta dough and finally assembling, cutting and packaging for the freezer. It is a great deal of prep work but I find it rewarding especially on those occasions when I need a quick meal. And they tastes so much better than any frozen ravioli that you find at the store. These frozen ravioli can go directly into boiling water and be ready in just a few minutes. And if you like toasted ravioli like we do, thaw a bag or two in the refrigerator. This batch made approximately 6 dozen ravioli. That will make quite a few meals for any family.
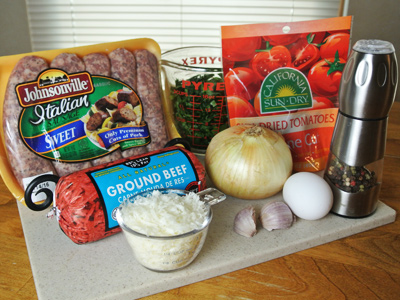
I made the meat filling with ground beef, sweet Italian sausage, spinach, sun dried tomatoes, onion, garlic, a blend of romano and parmesan cheese, and an egg to bind it together. Salt and pepper to taste.

Heat a skillet over medium high heat and brown the ground beef and Italian sausage.
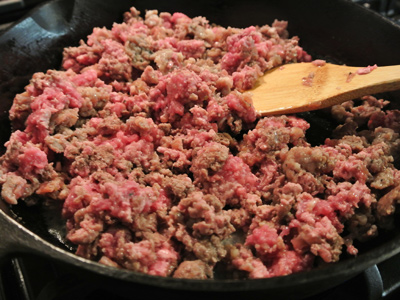
Use a wooden spatula or potato masher to break apart the meat as it browns.
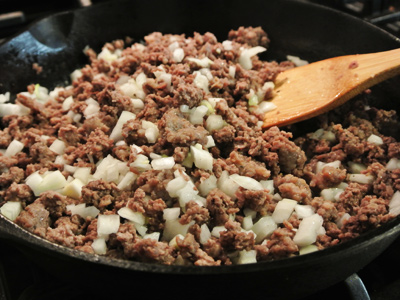
When it is almost browned, add the onion and garlic. Continue cooking until the onion becomes soft and translucent.

Next add the sun dried tomatoes to the mix. Add a bit of salt and pepper to taste.

Once everything is cooked, remove from the burner and let the meat cool.

Transfer meat to a food processor.
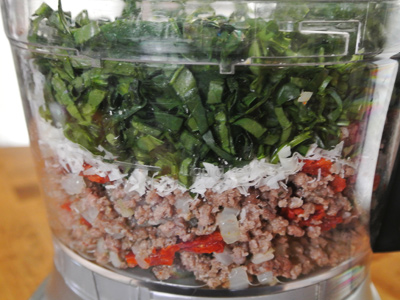
Add the cheese and chopped spinach to the mix.

Pulse on high until everything is blended.

Add the egg and pulse a few times to bind the filling together.
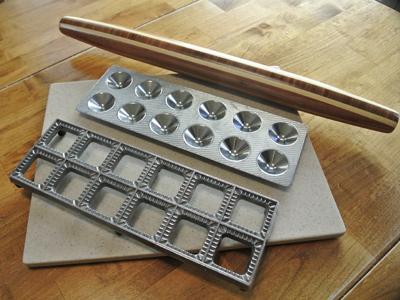
These are the tools that I use to make the ravioli. There is a ravioli tray with a mold and you’ll need a rolling pin as well. You can go to my Cheese Ravioli post for instructions on how to make the dough.

Place the first layer of dough over the tray and place the mold inverted to make an indention.

Fill each indention with a rounded tablespoon of meat filling. Brush some egg wash around the edges and between each square.

Place the next layer of dough on top and again place the mold and press to bind the dough together.

Roll the top to press the ravioli through the tray. This will also press out the air bubbles and seal the edges.
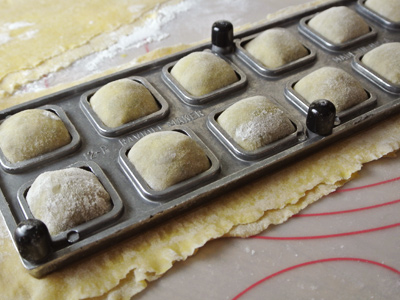
Turn the tray over and release the tray.

Use a pastry or pizza cutter to trim the edges and cut the ravioli into individual pieces.

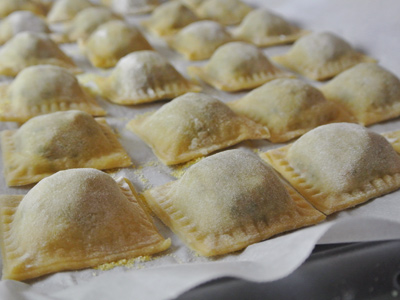
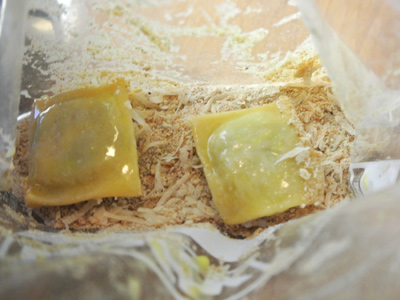
Line a baking sheet with parchment paper and sprinkle with cornmeal. Layer the ravioli individually on the tray and freeze for an hour or two.
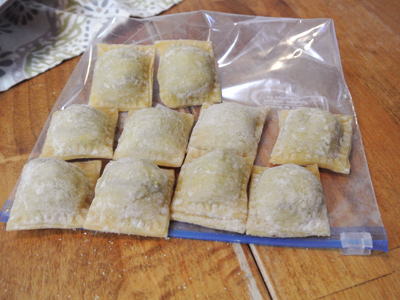
Once frozen they can be packaged into freezer bags. I usually package 12 or 18 to a package.
I made some toasted ravioli with the first batch. Dip each ravioli into a beaten egg and then toss in a mixture of bread crumbs and parmesan cheese.

Layer them on a plate when done. Heat a skillet with just enough oil to coat the bottom of the pan.

When hot begin adding the ravioli. Since the meat filling is already cooked we are really only browning the ravioli. Cook for a minute or two just until the bottom is crisp and brown.
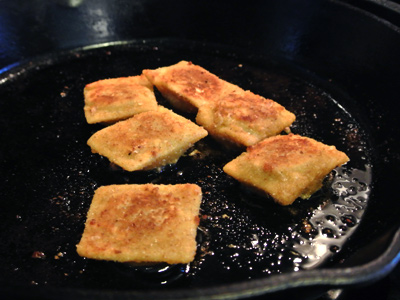
Turn them over for another minute. Transfer ravioli to a plate lined with paper towels. If you need to make another batch wipe the pan with paper towels to clear any crumbs that may burn in the next batch. Add another drizzle of oil to the pan and continue the process.

And there is a pile of toasted ravioli. Yum!
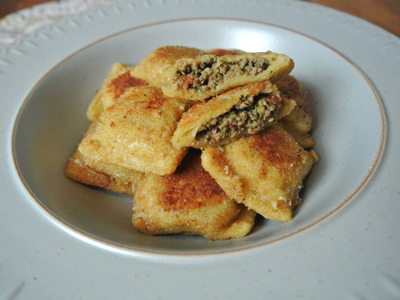
The meat filling has so many flavors coming through with the Italian sausage to the sun dried tomatoes, garlic and onion. So yummy!

Add some marinara sauce and a sprinkle of parmesan for the final touch. Enjoy!
Meat Filled Ravioli (to put up in the freezer)
Meat Filling
1 pound Ground Beef, preferably lean
2 links Sweet Italian Sausage
1 medium Onion, diced small
2 cloves garlic, grated on a microplane hand grater
1/2 cup Sun Dried Tomato (soaked in water to reconstitute)
2 cups Fresh Spinach, chopped
1/4 Cup Romano Cheese, grated
1/4 cup Parmesan Cheese, grated
1 Egg
Salt and Pepper, to taste
Pasta Dough, recipe follows
Egg Wash (1 egg plus 1 T Water)
Heat a skillet over medium high heat. Brown ground beef and Italian sausage, crumbling the meat as it cooks with a wooden spatula. Add the diced onion, garlic and sun dried tomatoes. Cook until onion becomes soft and translucent and meat is completely cooked through. Let meat mixture cool.
Transfer meat mixture into a food processor. Add the grated cheese and spinach. Pulse on high until everything is well combined. Add the egg and process until the mixture has bound together and appears somewhat pasty.
Place one sheet of dough over the ravioli tray. Place the mold on top to make small indention’s for the filling. Place a small dollop of filling in each mold. Make an egg wash with an egg and one tablespoon of water. Brush egg wash over the edges and between the dough squares. Place the top sheet of dough on top. Turn the mold over and squeeze down over the tray to seal the edges. Press in between each square to press out the air pockets. Use a rolling pin to press and roll the top layer and filling down into the mold. Turn over to release the ravioli’s. Cut the squares with a pastry cutter or pizza cutter. Dust a baking sheet with cornmeal and place ravioli’s single file on the sheet. Place in the freezer for 1 hour then place into marked zip lock bags for the freezer.
Pasta Dough Find step by step instructions here
2 cups All Purpose Flour, plus more for dusting
1 teaspoon Salt
3 Eggs, plus 1 egg for egg wash
1 tablespoon Olive Oil, plus additional for brushing on dough
Cornmeal for dusting
In a food processor combine flour and salt. Pulse a couple times to combine. Add eggs one at a time, pulsing a few times after each addition. Add in the tablespoon of olive oil and pulse. Test the dough by pinching between your fingers, then form into a ball. If too dry add a bit more olive oil. Sprinkle flour on a work surface and knead a little bit of the flour into the dough and mold into a smooth ball. Brush additional olive oil over dough and place in a zip lock bag to rest for about 30 minutes. This will allow the gluten to relax and will be easier to work with the dough. Make a second batch of dough or double recipe if needed.
Cut the ball of dough in half. Using your work surface, mold dough into a rectangle and flatten with a rolling pin. Run dough through the pasta maker 2 – 3 times at the highest or thickest setting. Pull the dough with the palm of your hand as it rolls through the pasta machine. Reduce the setting to medium and roll through another 2 times. Lower the setting to next to the thinnest setting and run through twice. Dust the sheets with flour before you run through the roller each time. The dough should now be long enough to cover the ravioli tray twice. Cut the dough in half and place one sheet over the ravioli tray. Place the mold on top to make small indention’s for the filling. Place a small dollop of filling in each mold. Make an egg wash with an egg and one tablespoon of water. Brush egg wash over the edges and between the dough squares. Place the top sheet of dough on top. Turn the mold over and squeeze down over the tray to seal the edges. Press in between each square to press out the air pockets. Use a rolling pin to press and roll the top layer and filling down into the mold. Take a knife and run around the edges of the tray to cut away any excess dough. Turn over to release the ravioli’s. Cut the squares with a pastry cutter or pizza cutter. Dust a baking sheet with cornmeal and place ravioli’s single file on the sheet. Place in the freezer for 1 hour then place into marked zip lock bags for the freezer.
To cook ravioli drop frozen ravioli in boiling pot of water for 6 – 7 minutes. Lift ravioli from pot with a slotted spoon and serve with pasta sauce.


8 thoughts on “Meat Filled Ravioli (to put up in the freezer)”
mjskit
What an inspirational post! I’ve been wanting to make ravioli for a long time and yours have my mouthwatering already. Great post!
LikeLike
NativeNM
What a nice compliment! It’s kind of ironic, we just had a package of the frozen ravioli a few days ago and it reminded me how good homemade pasta is. Thanks again MJ!
LikeLike
Cheryl
Hi Karen, this sounds so good. I’m in the process of making the filling, and unless I am blind, it doesn’t say anywhere how much garlic to use. Of course, now I’ll just do what I think works, but you might want to add in how many cloves of garlic to use. Thanks!
LikeLike
NativeNM
Good catch! I have added the garlic to the recipe. Thanks for letting me know! Hope you enjoy the ravioli.
LikeLike
Karen
Your filling sounds really great, how nice to have a big batch for the freezer.
LikeLike
NativeNM
Thanks Karen! Ravioli is a popular dish at our house and we only have a few bags left of the frozen. It may be time to make more soon.
LikeLiked by 1 person
Karen
Just wanted to stop back by and say “hello”. I hope you had a wonderful Christmas and that you will have a great New Year.
LikeLike
NativeNM
Thank you Karen! I have to say this was a wonderful Christmas with family this year. I hope you had a special holiday as well. Happy New Year to you and I look forward to reading about all your travels and recipes next year through your beautiful blog and photos!
LikeLiked by 1 person